
This post was also published on LockMeDown.com, a security-focused blog for developers written by Max McCarty.
This is the first post in a series called Docker for Devs, which will include:
- Containerize your Application Environment
- Creating an Application Development Image
- Hot Module Reloading and Code Updates in Containers (this post)
- Composing Multi-Container Networks
- Sharing Images with Your Team
We’ve got a crash course in setting up Docker and establishing a base production image and developer image using a simple node.js application involving the express.js framework.
In this part, we’re going to look at a real world example of hosting a universal (isomorphic) React application with an express.js server. Not only that, the developer build of this application utilizes Hot Module Reloading with the use of Webpack’s dev-server for immediate client updates during development.
While the overall goal is to show you how to utilize Docker for modularizing development environments that consist of any number of elements, in this specific part of the tutorial, we are going to establish the application container. In the following part of the tutorial we’ll add onto it with the inclusion of networking containers for a database and reverse proxy.
Getting Started
You can grab the source code for the application from GitHub.
Step 1: Create a Production Image File
Like before, we need a base image. However, if we use a Alpine Linux image like we did in the [URL LINK] first tutorial, we’ll be missing some necessary linux libraries that used by node-sass to compile SASS files. It’s not hard to have the Dockerfile RUN the necessary fetch command to acquire the missing libraries, or we can use a different base image that has all the necessary dependencies.
- Using your IDE of choice, add a file with the name "Dockerfile" to the project root:
- Copy in the below file contents
Dockerfile
FROM beevelop/nodejs-python
MAINTAINER Max McCarty
ENV NODE_ENV=production PORT=7000
COPY . /var/app
WORKDIR /var/app
EXPOSE $PORT
RUN npm install --production
RUN npm run build:prod
CMD ["npm", "run", "start:prod", "--production"]
Note: This image has approx. 1/3 larger footprint but takes about half the time to build. If you want to still use the smaller base image, you can grab this alternative Dockerfile.
What did we do?
Without rehashing some of the areas we covered in the previous two parts of this tutorial, the following are some of the new Dockerfile commands or variations we haven’t seen:
- We’ve specified a MAINTAINER which is simply the author and any choice of verbiage to specify how someone might contact the maintainer if needed.
- In addition, we have specified multiple RUN commands that will be run in order synchronously. Specifically, we are requesting that only the production NPM modules be installed in the image along with having the npm script we have specified in our package.json file labeled “build:prod” which will generate our production version of static files our application will serve.
- Though the CMD command isn’t new, you can see that we can specify any number of parameters in our array.
Step 2: Create the Base Production Image
- Verify there is no “public” or “node_modules” in the root of the project

- From a terminal/prompt navigate to the root of our project directory.
- Run the command (including the period at the end):
docker build -t hackershall-prod-i .
Output:
Step 2b: Verify Image
- docker images

Step 3: Create the Production Container
TIP: Creating a container (instance of our image) to verify there are no problems, can help reduce future issues that show up in downstream images.
- Run the command
docker run -d --name hackershall-prod-app -p 7000:7000 hackershall-prod-i
Step 3a: Check Container Logs
You might be tempted to assume you have to run in attached mode (without the detached -d flag) in order to see the output and any errors. However we can still acquire the output of a generated and run container using the following command:
docker logs hackershall-prod-app

Step 3b: Validate Static Files
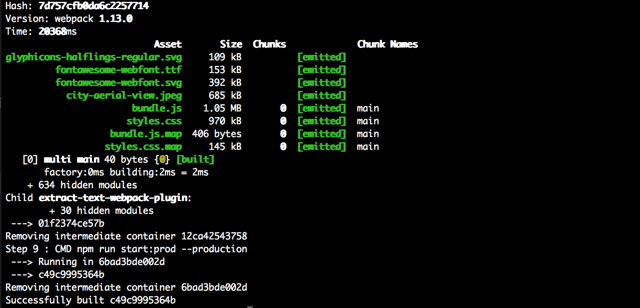
Part of the Dockerfile of this image was RUN-ing the "npm install —production" and “npm run build:prod" npm script which ran webpack to build our production grade static files:
Let's see if indeed they were built:
- From a terminal/prompt run
- docker exec -it hackershall-prod-app /bin/sh
- We can run “ls” command from the prompt to verify we have a “public” and “node_modules" directory and the following to see the contents of the public directory:
- ls -1 public

What did we do?
We accessed a bash shell on the running container and was able to verify that the “public” directory exists with all our static files. Remember we verified the public and node_modules did NOT exist?
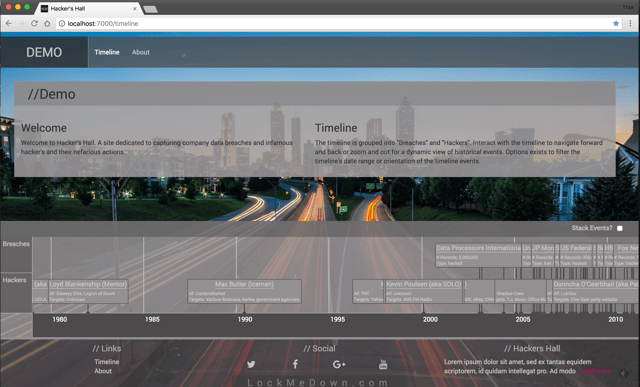
Step 4: Verify Running Application
Finally, let's quickly verify the application is running from the container.
- From a browser, access http://localhost:7000
If successful you should see:
Step 5: Create a Developer Image File
Now that we have a successful running container of our production grade application, let's create a Docker image file that will allow us to build a developer version of our application.
Step 5a: Verify Initialization Shell Script Exists
- From a terminal/prompt, run the following command to verify the file “initialize.sh" exists and is executable (rw: read/write, x: executable)
ls -l
Step 5b: Add Development Dockerfile
- Add a file with the name “dev.dockerfile” and add the following content:
FROM hackershall-prod-i
ENV NODE_ENV=development
CMD ["./initialize.sh"]
Step 6: Generate the Development Application Image
Let’s create the image using the dev.dockerfile we added in the previous step:
- Run the following command to generate the image:
docker build -t hackershall-dev-i -f dev.dockerfile .
What did we do?
We have seen all these before in the previous parts of this tutorial, but essentially we:
- Gave the image a tag of “hackershall-dev-i” using the -t flag
- Specified we want to use the dockerfile “dev.dockerfile” using the -f flag
- and specified the context to be the current directory by using the “.”
Step 7: Generate Development Application Container
Here’s where the fun begins. We’re going to generate a running container from the image in the previous step, which is using our production image as a base.
- From a terminal/prompt, run the following command to generate and run a container (instance of the image). You’ll need to replace the first part of the volume specified with the correct path on your local machine:
docker run --name hackershall-dev-app -p 7000:7000 -v /path/to/root/of/project/:/var/app hackershall-dev-i
TIP: Unlike the Docker RUN command, starting a stopped container will start the container in detached mode. Use the ATTACH command to attach to an already running container (e.g. docker attach <container>). Alternatively, you can use the attach -a flag when you START the container.
What did we do?
Again, we have seen all these before, but we just:
- generated and ran a container (instance of our image)
- Gave the image a name using the --name flag
- Mapped the local host port of 7000 to the internal “exposed” port of 7000 on the container using the “-p” flag
- Created a volume to be mounted that pointed from our project root directory to the working directory on the container as specified by the WORKDIR command in the dockerfile
- Finally, listing the image we created in Step 6 as the image to use when generating the container
Step 8: Live Editing with Hot Module Reloading
Finally, at the pinnacle of this part of the tutorial, let's verify our running container has installed the node modules locally in our mounted volume and that we can make live edits and see them immediately updated by Webpack’s dev-server:
IMPORTANT: If you ran the previous Docker RUN command with the detached -d flag, you’ll need to keep checking the logs “docker logs hackershall-dev-app” until you see that the express server is started.
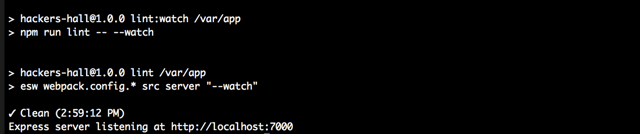
Step 8a: Verify Running Container
When the container is completely up and running we should be able to verify:
- a “node_modules” folder now in the root of our project folder.
- either at the terminal/prompt or from the logs, that the express server is running:
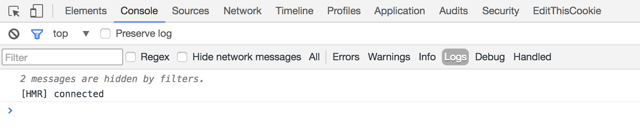
Step 8b: Hit the Website
- As before, hit the site http://localhost:7000
- Open the Developer Tools of the Browser you’re working with (I’m using Chrome)
- You should see the message “[HMR] connected”
Step 8c: Live Editing with Hot Module Reloading
Let’s make a change to the source code and see if the Hot Module Reload capabilities of the webpack-dev-server will update the site:
- Navigate on the site to the /about page: http://localhost:7000/about
- With the developers tools open
- Edit the /shared/components/about/about.js file in your IDE of choice
Original:
export default class About extends React.Component {
render() {
return (
<div className="container">
<div className="about primary-bkgd">
<p>{info.AboutText}</p>
</div>
</div>
);
}
}
After:
export default class About extends React.Component {
render() {
return (
<div className="container">
<div className="about primary-bkgd">
<h1>About the Site</h1>
<p>{info.AboutText}</p>
</div>
</div>
);
}
}
- Back in the browser, we should see the following console messages:

- And the site reflect the changes:

Hot Module Reloading: The concept of “reloading” a webpage in the browser when edits are made to the source code has been around for while. However, anytime the “refresh” is done, the application state would be lost. Hot module reloading is an improvement that swaps out only the code that was actually changed without losing the current application state. At the end of this step is some information regarding the HMR setup.
Webpack’s Dev Server and HMR
Part of our list of entry points for webpack config file webpack.config.dev.js is the npm module react-hot-loader.
Webpack.config.dev.js
entry: [
"react-hot-loader/patch",
Finally, in our main express.js server “server.js”, if not running in production, we start up the webpack dev server along with npm module webpack-hot-middleware middleware component to enable the ability to do hot module reloading.
server.js
if (process.env.NODE_ENV !== "production") {
app.use(require("webpack-dev-middleware")(compiler, {
noInfo: true,
publicPath: webpackConfig.output.publicPath,
}));
app.use(require("webpack-hot-middleware")(compiler));
} else {
app.use("/", express.static(path.join(__dirname, "../public")));
}
Bonus Time
Everyone likes bonus’ right? Well here are a few Docker nuggets of knowledge you might find useful.
Docker Ignore File
Based on the context that an image is being built on, you can exclude files or directories by creating a .dockerignore file in the root of the context. Any files or directories that match patterns listed in the .dockerignore will be excluded.
- Create a .dockerignore file (similar to Git’s .gitignore) to specify files and folders you want to exclude from the image.
You’ll notice a .dockerignore file already exists in the project root with the folders:
- node_modules/
- public/
Conclusion
This was only half of this part of the tutorial segment, but we have managed to generate a production image that we can use as a our base image and see some advanced development tools working from a Docker container. In the next part of the tutorial, we’ll get introduced to a very powerful tool of Docker “docker-compose” where we can start bringing up multiple containers and networking them all with a few commands.
We’ll end up recreating the development application image in the next part of the tutorial, this time with some tightly coupled components such as a database and possibly more.